实验室机器人控制代码
import RPi.GPIO as GPIO
import serial
import time
ser=serial.Serial("/dev/ttyACM0",115200,timeout=1)
while True:
    ser.flushInput()
    print("please input the number of steering engine:(1:left;2:right)")
    engine=input()
    print("please input the channel of steering engine:")
    channel=input()
    print("please input the angle of the steering engine:")
    angle=input()
    print("please input the second of the steering engine:")
    second=input()
    data=engine+"#"+channel+"P"+angle+"T"+second
    print("send data:"+data)
    ser.write(data.encode("utf-8"))
    #time.sleep(1)
    response=ser.readall()
    if response!=None:
        result=response.decode("utf-8")
        print("receiced data:"+result)
        time.sleep(1)
        #print(response)
    else:
        ser.close()
#include<SoftwareSerial.h>
SoftwareSerial serial_1(6,5);
SoftwareSerial serial_2(11,10);
String data = "";

void setup(){
  Serial.begin(115200);
  serial_1.begin(9600);
  serial_2.begin(9600);
}

void loop(){
  while (Serial.available() > 0){
    data += char(Serial.read());
    delay(2);
  }
  if (data.length() > 0){
    judge(data);
    data="";
  }
}

void judge(String command){
  if(command[0]=='1'){
      command=command.substring(1);
      Serial.print("left:"+command);
      moveSteeringEngine(serial_1,command);
    }else if(command[0]=='2'){
      command=command.substring(1);
      Serial.print("right:"+command);
      moveSteeringEngine(serial_2,command);
    }

}

void moveSteeringEngine(SoftwareSerial serial,String command){
  serial.println(command);
}
基础知识
-
封装:元器件在电路板上的实际投影,包括外形、实际尺存和焊点。
-
DIP封装(Double Ln-line Package):双列直插式封装
-
LQFP封装:薄型QFP(Low-profile Quad Flat Package)指封装本体厚度为1.4mm的QFP
-
不同元器件有不同封装形式,同一种封装形式也可以表示为不同元器件。
-
AD软件一般说两图两库:原理图库和PCB库,原理图和PCB图。
    graph TD
  A(建立工程)-->B(建立两库两图)
  B --> C(保存整个工程)
  F[AD项目建立流程]
电容选择
-
1uf=1000nf,1nf=1000pf
-
在电源中要加电容滤波,在每个芯片的电源引脚放置一个0.1uf的电容去耦。
-
电容分两种:极性电容和非极性电容。极性电容
等效电容示意图:
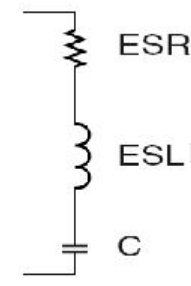
ESR是电容的串联等效电阻,ESL是电容的串联等效电感,C是真正理想的电容。ESL和ESR是由电容的制作工艺和材料决定的,没法消除。ESR影响电源的纹波,ESL影响电容的滤波频率特性。
容抗计算公式: (w:角频率,f:频率,我国国家电网对工频是50Hz,C:电容值)
感抗计算公式: (L是线圈电感,单位是亨利)
当频率很低的时候是电容起作用,而频率高到一定的时候电感的作用就不可忽视了,再高的时候电感就起主导作用了。电容就失去滤波的作用了。所以记住,高频的时候电容就不是单纯的电容了。
实际电容的滤波曲线如下图所示:
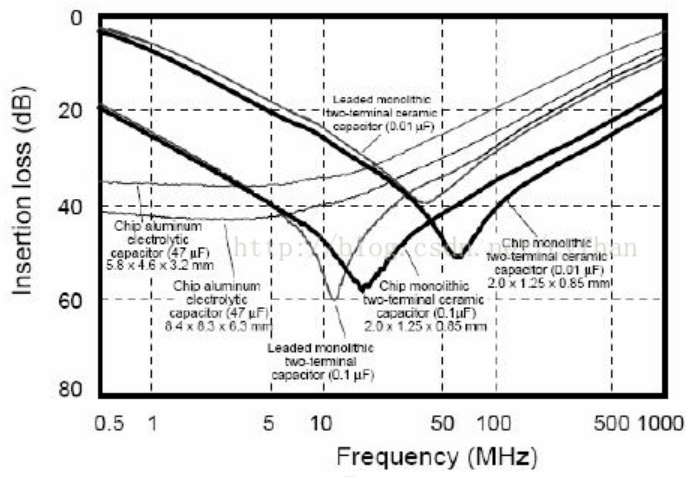
参见上图,我们想要的最好的滤波效果是在“谷”底,就是曲线凹进去的尖尖,在这个尖尖的时候,滤波效果做好,当我们的芯片IC内部的逻辑门在10-50Mhz范围内执行的时候,芯片内部产生的干扰也在10-50Mhz,(比如51单片机),仔细看上图的曲线,0.1uF电容 (有两种,一种是插件,一种是贴片)的谷底刚好落在了这个范围内,所以能够滤除这个频段的干扰,但是,看清楚,当频率很高的时候(50-100Mhz),就不是那么回事了,这个时候0.1uF电容个滤波效果就没有0.01uF好了,以此类推,频率再高,选用的滤波电容的量级还要变小。
参考如下:
DC-100K 10uF以上的钽电容或铝电解
100K-10M 100nF(0.1uF)陶瓷电容
10M-100M 10nF(0.01uF)陶瓷电容
>100M 1nF(0.001uF)陶瓷电容和PCB的地平面与电源平面的电容